.jpg)
Choose Your Own Adventure: Python Edition
A tutorial, with code examples, of how to create a branching paths story in python.
Have you ever read a “Chose Your Own Adventure” book? In these books you make choices and flip through the pages to the part corresponding with your choice. They are a great deal of fun and were a childhood favorite of mine. Did you know you can create modern rendition of these books with some simple code. This is possible to do in many coding languages, but I’m going to focus on using python is this tutorial.
Step 1: Draw your Decision Tree The most important factor in a “Choose Your Own Adventure” is the choices you give to the participant. It’s best to plan out these decisions and their possible outcomes before you start to code. The best way to do this is to grab a piece of paper and set a starting point. From there you can make a decision tree outlining the different paths a participant can take in your story.
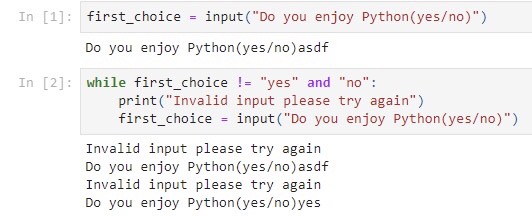
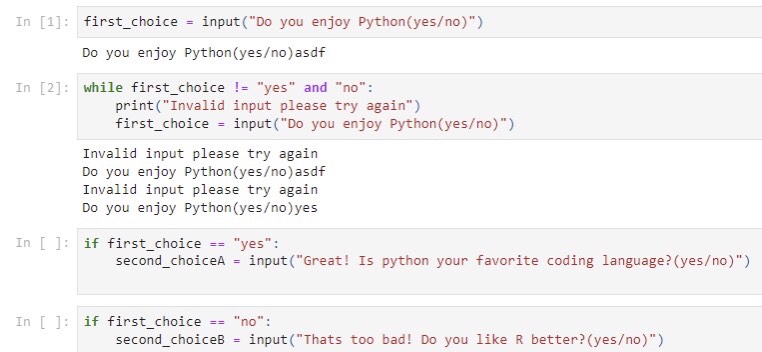
Step 2: Create Variables to Store the Decisions A good place to start on the code is the decision variables. For every decision in the tree, name a variable and set it equal to the input() function. Inside the input function, in quotes, you can put the prompt for the question the participant is answering. The input() function will first print the prompt you put inside of it, and then the function will wait for a response before moving on to next line of code.

Step 3: How to Only Accept Valid Inputs In some cases, such as asking the participant for their name, we don’t want to restrict inputs the participant can use. However, in most cases we are looking for a specific answer. For example, we may ask a “yes” or “no” question to the participant. The valid answers the participant can give should be given in the prompt from step 2. The simplest solution here is an “do-while” loop. To do this we want to have an “while” statement that sets the decision variable not equal to the possible answers your looking for. Put the possible answers in quotes and separate them by “and”. The code in the loop should simply be your code you used to initialize the decision. You can also add text in that tells the participant to try again.
Step 4: Two Ways to Move from Branch to Branch There are two ways to progress the story after a decision is made. First, you can put the rest of the story innsie an “if” conditional after the particpant makes a decision. This is really messy method and can lead to many complications. This really only can be used for very simple and short stories. The better option is to just use conditionals the refer back to the decision variables. For example, if your first decision was a “yes” or “no” question and you’re writing the continuation for only those who selected yes, you would simply have an “if” statement referring to that first choice. Then you could write the continuation for those who selected “no”. This can be taken a step further by incorporating a “if” statement that refers to multiple choices. For example, you could have the third question be conditionial on the first two questions together.
Step 5: Filling in the Story The easy part. Now you get to insert your story. Depending on your story you are going to need print statements at the beginning, before the “if” statements, inside the “if statement, or even at the end as a conclusion. Once you have all your text coded you may start making test runs. It’s best to test out every branch of your story and make sure the code is functioning properly.
Conclusion This is just the beginning of what you can do in python. Using these concepts as groundworks, you can go on to create a full text adventure games. There is unlimited options. You can add in a health system, enemy encounter, inventory, riddles, and even level-up system. Thank you for reading this guide and please leave any comments if you’d like to see a guide to related topics.